Install instructions for the: Axis A-22
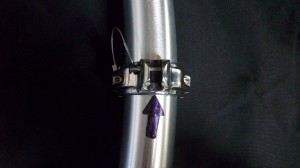
1: You must first mount the Front clamps 33 “above where the tower pipe comes out of the base. The clamp should be installed with the pin up. This will ensure that the clamps work properly and the rack will stay securely in place .The lanyard should be installed between the clamps sections so that it surrounds the bolt .When tightening the clamp do not over tighten the side with the lanyard See Fig 1-A Always leave pin installed when boat is in operation or being transported. See fig 1-A
2 : Loosely place top clamps on the tower bar just outside the gusset. see fig 2-A Place the struts in clamp with the 90 degree side to the clamp and the straight side hanging down.
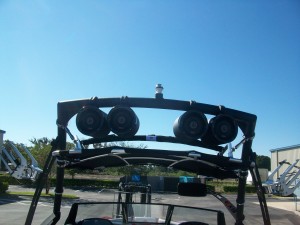
Fig 2-A
3: Install the rack in the front clamps by inserting the ball ended pivot into the sockets. If the clamps are installed correctly the rack should sit in the sockets. Insert pins and check the rotation. As you tilt the rack, look at the clamp and assure that the stainless steel on the clamp is not rubbing on the pivot ball (rotate clamp slightly if necessary).The plastic insert should be the only thing that touches. This Rack was designed with adjustability to cover any manufacturing tolerances in the tower. Centering of the Rack will be necessary, to center the rack ,loosen the cam lever clamp on the rack and move the rack until an equal amount of stainless steel pivot tube is showing on both sides.
4: When setting the rear clamps, if you move the clamps lower the rear of the rack will drop, if you move them up the rear will raise. The Speakers should have 1 to 1.5 inches of clearance between the rack and the speaker. Once you are satisfied with the clearances, tighten one of the clamps. To remove any slack in the rear, attach the strut to the rack. On loose side, loosen the clamp and slide clamp down the bar to make just a slight bind on the rack and make a tight fit.
5: Gas spring : The proper installation of the gas spring is critical. With the gas spring attached to the rack and the rack in the horizontal position with both struts in place, compress the gas spring and prepare to mark the location where the ball is to be installed. Before marking the final location you must have someone tilt the rack while you hold the end in place. This will insure that the gas spring can operate the full range. When holding the spring, make sure that the flat on the socket end could lay flat on the tower during the full range of rotation. When the ball is drilled and tapped it must stick straight out of the tower so there is no bind on the socket of the gas spring. Once you have tilted the rack while holding the ball socket close to the tower mark the location for the ball to be installed. Then repeat the steps of holding the socket on your mark while tilting. Once you are completely sure that your mark is good, center punch the hole and drill a pilot hole followed by a ¼ inch hole. You will be tapping a 5/16 hole for the ball stud.(a 5/16 -18 tap calls out for a 17/64ths drill for 75% threads but you want more than 75% so the ¼” will be used). I can’t stress enough that proper placement of the ball stud is critical.
6: Trailering Tie downs are Included with the Rack .These tie downs help secure the front of the Rack while the boat is being trailered. This insures that even if the rear pins were to fail or fall out, the Rack will stay securely in place. To install the tie downs, wrap the strap with the female section of the buckle around the frame where the pipe is exposed by the canvas cut out and pass it through the loop .Now wrap the male section through the open section of the tower base and feed it through the loop. Attach buckles and tighten. Repeat for the other side. Do not over tighten.
Go back and check all fasteners to make sure they are tight and that will conclude the install. Thanks and enjoy


